Alright not sure if you guys get the title but mesti ada yang pernah nampak or maybe tau,
macam mana cara nak buat gambar yang kita screenshot tu ada bingkai phone kita sekali, kan?
macam mana cara nak buat gambar yang kita screenshot tu ada bingkai phone kita sekali, kan?
Actually I think dah lama rasanya kewujudan style gambar macam tu kita jumpa kan especially bila tengok testimoni products ke apa tu kan, haa perasan tak?
Ni diaa siap phone frame tuu
Alright so, lepas I post gambar, ada yang reply tanya macam mana cara buat style gambar screenshot macam tu..Then I perasan ramai jugak ye yang tak tahu lagi cara nak buat kan so I think okay jugak if share kat sini kan.
Simple je nak buat tau actually, first of all, untuk yg dah update IOS 13 ke atas mesti dah ada app Shortcuts kan? Haa sebab nak buat tu kita guna app Shortcuts tu je so kalau belum ada & belum update, better la you guys update & siap ada app tu dulu okayy.
Ni yea app Shortcuts tu
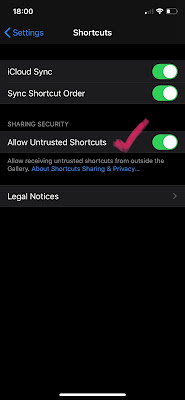
Then, you guys pergi ke setting, pilih Shortcuts tu, and set kan ‘Allow untrusted shortcuts’
okay. Setting tu you guys boleh jumpa under Sharing Security, boleh rujuk gambar ye.
Lepas dah set kat setting Shortcuts tu, you guys buka app Shortcuts tu, and run dulu anything
dalam tu, contohnya you guys add alarm ke, buat shortcut untuk call ke, ha gitu.
Just click dekat ‘create shortcut’ tu pon boleh, or you guys boleh usha dulu since dia ada
siapkan banyak jugak suggestion shortcut yang boleh di add / di buat based from your lifestyle
and all. Contohnya boleh rujuk gambar jugak yea.
Setting —> Shortcuts —> Allow untrusted shortcuts
Contoh yea, you guys add alarm on 7 ke, add untuk call, or just add lain-lain yg bersesuaian kat create shortcut tu. Then, dah run anything
kat situ barulah you guys boleh add untuk frame thingy tu okay.
yang style frame I cakapkan tu. You guys click SINI (for frame media kit etc tu) , nanti dia akan pop up details media kit frame tu, you guys scroll sampai bawah sekali, you guys akan jumpa pilihan untuk ‘add untrusted shortcuts’ ataupun cancel, you guys pilih ‘Add untrusted shortcuts’ tu okay.
Then dia akan di add ke shortcuts item you guys as Screenshot Frames IOS tu (jadi macam dalam gambar di atas tu yea yg ada tanda red tick tu).
Okay now, you guys open frame media (click je kat Screenshot Frames IOS) tu tadi, akan ada pop up untuk allow access to photo / album etc tu, you guys pilih allow okay. Then automatically dah masuk dalam album you guys, so just pilih je gambar mana yang you guys nak, satu ke dua ke, boleh je okay. Dah pilih and tekan done, tunggu dia siapkan gambar frame and voila, dah nampak depan mata kan kejadiannya tu hehe. So you guys pilih save image, dia akan save ke album you guys. Dah siappp hehee.
These are antara things yg you guys boleh explore and add to shortcuts jugak okay
Untuk frame phone tu nanti actually if nak pilih colour phone etc pon boleh, ikot suka you all lah ye hehe. Nanti you all explore la. Selain frame ni, banyak lagi benda-benda yang macam bagus / convenient jugak untuk di add dalam Shortcuts app tu, contohnya shortcut untuk save video dari Youtube, shortcut untuk buat grid frame (gambar jadi tersusun berderet in one pic, ha yang tu pon cantik jugak tu hehe) and more. Ala tu semua you guys boleh google je for top 10 ke top 20 ke things to add to your Shortcuts app, then nanti pilihla mana yang berkenan kan daripada banyak-banyak link sharing to add tu okayy hehe.
Alright, if you guys dah dapat try buat, jemputlah share hasilnya jugak yea kat sini, or nak tag kat igstory ke pe pon ok jee, nice jugak if dapat tengok kan, just for fun di kala #mco ni kan hehe. I hope sharing I ni membantu la jugak sedikit sebanyak ye. Selamat mencuba and stay safe duduk diam-diam di rumah tu yeaa, till next time guys! ❤️


utk pengguna iphone yg nk buat screenshoot ada frame ni , bole la refer entry ni..tq for sharing
ReplyDeleteTak pernah guna app shortcuts ini sbb bila nak screenshot buat cara biasa je tak perlu frame huhu..
ReplyDeleteOoo sepanjang guna iphpne, belum pernah plak guna, gitu rupanya, bolehlah cuba nanti, thanks ya for the info..
ReplyDeleteKita tak pakai iPhone. Setia dgn Samsung Note aje. Hehe. Tq share. Nanti mana tau nak beralih arah beli iPhone tak dela terkial2 nak SS.
ReplyDeleteFollowed your blog! Because it is so pretty! I love the pinks. Nice content, this is helpful for me.
ReplyDeletewww.adlinatasyaa.blogspot.com/
Pengguna I Phone boleh refer post ni. Saya pengguna Samsung. Bagus info ni jadi pengguna I Phone boleh manfaatkan.
ReplyDeleteowh rupanya aps ni ya bolehla download. baru guna iphone dalam 2 bulan ni belum explore lagi aps baru. Bolehla try nanti
ReplyDeleteSemenjak update app shortcut tu mommy tak click pun. Hahaha. Baru tahu function nya
ReplyDeleteYang guna iphone boleh guna apps ni. Mimi guna huawei je. Dari dulu memnag guna android. Tapi memnag cantik bila screenshot sekali dengan hp macam tuh. Nice sangat
ReplyDeletewow! trperinci. easy to follow.
ReplyDeletebut, i am not iphone user :)
kena share widely ni bcoz lebih ramai tahu, lebih mudah.
siap ada frame! terbaik.
bagusnya ada instruction camni, mudah nak folow. kadang saya pun lupa caranya, padahal saya user iphone
ReplyDeleteTak guna iphone tapi at least tahu lah jugak info ni kan. Hehe. Nice sharing. Mesti ramai nak tahu.
ReplyDeletekita tak guna iphone tapi apa salahnya nak tahu jugak kan. mana tahu leh guna iphone ke nnti.
ReplyDelete